| March 12, 2023

Not to brag, but I am quite proud of the latest storage mechanism for my adornments. After searching high and low for an organizer set that would fit my goals, I just could not find what I needed - so decided to make my own! As a maker for many years (even before “maker” was common parlance), I have experience with many different tools and platforms for creating “stuff”, so I set out to winnow down the various options out there.
Material
One of the key requirements was to easily be able to reorganize and change up the storage system. Over the years, I’ve learned that my collection is far too dynamic to be supported by a static system. I also wanted something that would look good and present my adornments in a way that allows them to take center stage. Naturally, another factor that guided my decisions was overall initial cost and ongoing costs as I add and remove to the collection. With materials like aluminum being easy to work with but expensive, plastic components being too complicated to join well, wood being attractive but not flexible enough for reorganization, foam being too flimsy and unattractive, I was having a hell of a time settling on a material and approach.
Eventually the solution hit me as I was working on some 3D prints. I should just design and build the holders from scratch! I chose to start with a matte black PLA to accent the faux leather liner of the drawers. I used Overture’s 1.75mm option and the finish came out excellent, but the stuff was definitely finicky when it came to sticking to the bed.
Design
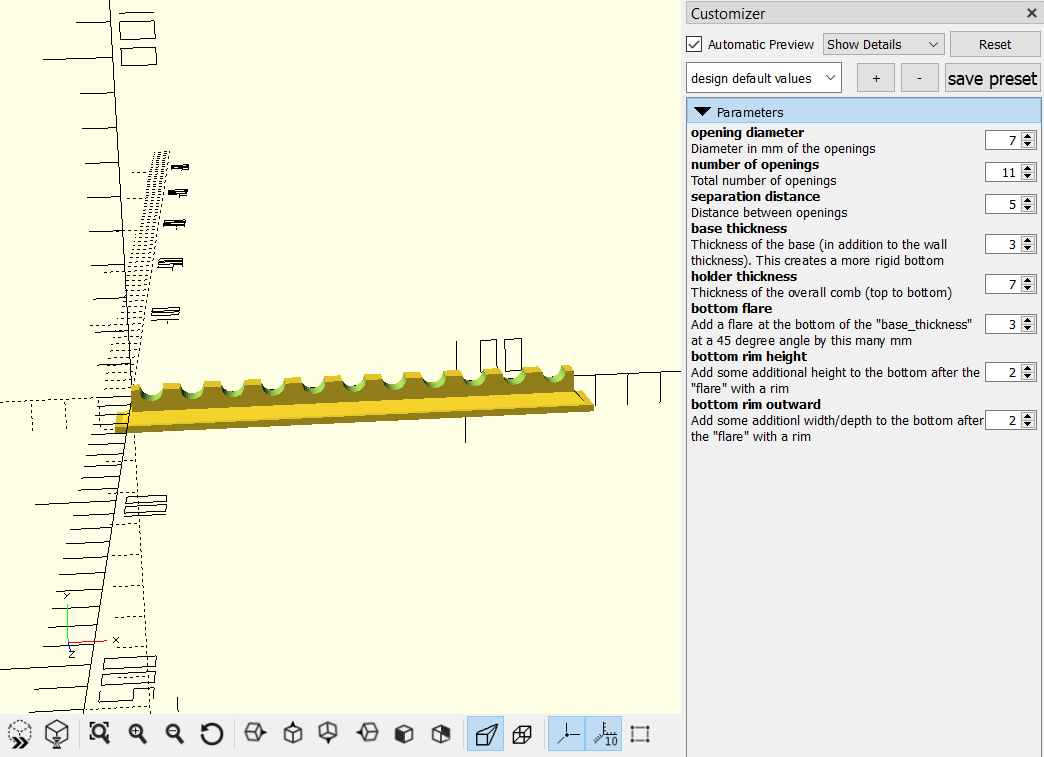
Knowing that adornments come in all shapes and sizes, it was important to me that I design holders to be parametric (parameter driven) so it isn’t a hassle to generate many sizes. My go-to modeling program for simple work is the old, free version of Sketchup - but it’s just not cut out for purposes of generative design. I decided to look around for other options and ultimately landed on OpenSCAD. It is a free and Open Source progamming-based CAD tool. As someone plenty familiar with software development, the concepts were easy enough to pick up.
Through much trial and error, I ended up with the model seen in the cover art of this blog entry and a u-shaped holder that I adapted for holding sounds and plugs.
Features:
- Prints without supports and with two layers of standard .4mm nozzles
- Embossed sizes on front of holder for easy identification of holders you need more of
- Male and female notches so holders can be ‘clipped’ together in a row
- 45 degree angle incursions into the holder so rings will sit centered in the holder
- Chamfered bottom to prevent ’elephants foot’ print issues from causing gaps between holders
- U-shaped cutout for the walls to reduce material needs and let the adornments stand out
Both models feature a number of options that allow you to load them with OpenSCAD and tweak until they perfectly fit your desires. Printing them after generating and slicing was simple (but finicky since this filament doesn’t like to stick). I sliced them for only 10% infill and used standard print speeds otherwise.
Optimal sizes in my experience:
- Shaft and glans rings: 52mm wide, varying height, 30mm depth, and 9mm raise
- Cock rings and cages: 67mm wide, varying height, and 39mm depth
- Huge rings: 90mm wide, varying height, and 45mm depth
- Boxes: 77x77mm with 0 incursion
- U holders: 7mm opening with 5mm separation
Download the holders model here:
NOTE: sometimes these warp while cooling. I could not find a way to avoid it 100% of the time. Most of the times, the warping still results in a dimensionally correct holder, but being able to clip holders together can be a pain in the ass. After clipping them together once or twice, they tend to be compliance thenceforth.